Showing posts with label STEEL CONSTRUCTION. Show all posts

Friday, October 29, 2010

Using steel for replacement bridges to yield cost savings and environmental benefits

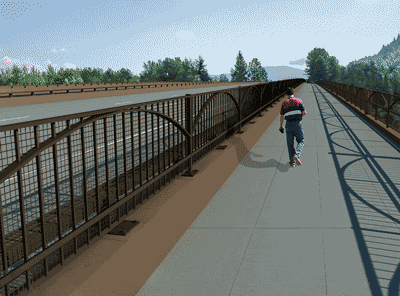
<<The eastbound bridge over the Sandy River will include a combined bicycle and pedestrian crossing that will accommodate users traveling in both directions.

SINCE 2003, the Oregon Department of Transportation has repaired or replaced hundreds of aging bridges around the state as part of the $1.3 billion OTIA III State Bridge Delivery Program (see sidebar). Most of these are straightforward highway bridges and, from a motorist’s point of view, hard to distinguish from the roadway itself. But for those charged with bringing the state’s surface transportation system back up to capacity, some upgrades are proving to be more challenging than others.
From a fiscal, technical, environmental and aesthetic standpoint, replacing the two 60-year old, seismically vulnerable, narrow bridges that carry Interstate 84 across the Sandy River near Troutdale, Ore., posed some very distinct challenges for the project team.
Located at the mouth of the world-renowned Columbia River
Gorge National Scenic Area, the new bridges initially were designed as post-tensioned concrete structures each with four 200-ft spans and a total length of 800 ft. In February 2009, their estimated total cost of more than $90 million, well over the budget, triggered a complete re-evaluation of the project. An analysis of the estimate for the Sandy River bridges revealed that a large, expensive substructure would be required to support the heavy concrete superstructure.
Other bids in the OTIA III bridge program had shown that structural steel prices were declining. An economic analysis indicated that this trend was likely to continue. Faced with the conflicting goals of reducing cost and using longer spans that would protect the ecologically valuable Sandy River, which is home to threatened species such as chinook salmon, coho salmon and steelhead trout, the project team redesigned the bridges using steel box girders, abandoning the concrete design to take advantage of favorable steel prices and reduce superstructure weight.
To minimize delays to the project letting, the redesign focused on using simple repetitive details and a balance between steel weight and fabrication cost.

Due to the project complexity and sensitive location,
ODOT used best-value bid selection criteria for this project rather than simply awarding the project to the lowest bidder. Price, qualifications and technical approach were all factors included in the scoring to determine the best value bid and selection of the contractor. Hamilton Construction
Co.’s bid of $48.5 million was not the lowest bid; however, the quality of its technical proposal gave the company the best value score.
In addition to typical budget constraints, the Sandy
River Bridge project had cultural, aesthetic and technical challenges. These highly visible structures attracted interest from a number of stakeholders in the design phase.
One of the most important considerations for this project is its location in the Columbia River Gorge National Scenic Area. The CRGNSA was established by Congress to protect and provide for the enhancement of the scenic, cultural, recreational and natural resources of the gorge. ODOT worked with the Columbia River Gorge Commission, U.S. Forest
Service, Federal Highway Administration, Oregon Department of Fish and Wildlife, and the three counties within the
CRGNSA to develop an Interstate 84 Corridor Strategy that would allow it to meet public safety and transportation needs while also meeting the National Scenic Area provisions.
The I-84 Corridor Strategy required the bridges to blend in with the surrounding natural environment. The final modified-contemporary design for the Sandy River bridges includes steel box girders with a rock facade on the bridge piers and abutment, and decorative pylons in dark earth-tone colors. A sleek, trim profile with a rough, rocky texture and an irregular pattern will minimize distraction and the reflectivity of various highway features. The steel box girder depths vary from 5 ft, 6 in. to 11 ft. In total, the two bridges require more than 8 million pounds of AASHTO M270 Grade 50 steel, which will be painted to comply with aesthetic guidelines.
Both eastbound and westbound bridges have spans of 200 ft, 220 ft, 220 ft and 200 ft.
Proportionally shorter end spans and longer interior spans would have been preferable from a structural perspective, but the span arrangements chosen keep the substructures out of the low-flow channel and avoid the existing bridge foundations.
The eastbound bridge includes a 16-ftwide multi-use path. This feature, unusual for an interstate highway bridge, was included to allow pedestrians and bicyclists to safely gain access to popular recreation areas in the Columbia River Gorge. Both bridges have three 12-ft lanes and two 12-ft shoulders.
Environmental and seismic issues were a challenge regardless of the materials selected, but changing the design of the superstructure to steel girders provided a number of benefits in these areas.
Because the Sandy River is home to chinook salmon, coho salmon and steelhead trout, all of which are threatened species,
ODOT was required to reduce the environmental impact of the project both during and after construction. One of the team’s design goals was to open the channel so that the fluvial geomorphology could return to a more natural state.
Environmental regulatory agencies requested longer bridges without additional substructures, which would further open the channel to provide better fish habitat.
Piles placed to support falsework were a concern because completely removing the long piles located below the new bridges would be impractical. Leaving the piles in place would conflict with the goal of restoring the channel to a more natural condition.
By building with steel, the amount of falsework the bridge crew will develop for the bridge structure will be notably less than what would have been used for concrete, because only one tower will be needed on each side to erect the girders.
During construction, strict limits will also be imposed on the volume of material, including fill and concrete that can be placed in the channel. Construction activities within the area of the ordinary high water are limited to a six-week period each year.
Foundation conditions at the site can only be described as challenging from a design perspective. The bridge rests in a seismically active area with more than 100 ft of loose, saturated sand overlying the bedrock at the site. Because lateral forces that develop during an earthquake increase with the mass of the superstructure, the potential for soil liquefaction during a seismic event was analyzed extensively during design. Reducing the superstructure mass and weight not only helped to reduce potential seismic impacts, but also shrank the drilledshaft size from the 10 ft diameter required for the concrete design to 8 ft for the steel bridges.
Building smaller shafts also helped meet the environmental requirement to reduce the volume of material removed and replaced within the channel. These reductions lowered costs as well.
In the end, our reworking of the design plans included only two visible differences between the steel and concrete versions of the bridges. The first is that with concrete there would have been two box surfaces underneath the bridge, and with steel there will be three or four. The new steel bridges will also be 40 ft longer to the east to widen the channel, which helps diminish environmental impacts.
With all of these reductions in environmental impact, construction cost and overall bridge load, the decision to redesign the bridges with steel girders has proven to be very beneficial to the agency. With a completion date slated for 2013, we look forward to seeing travelers through the Columbia River
Gorge benefit from the bridges’ replacement for decades to come.

Thursday, October 28, 2010

A Structure That Teaches: Instrumentation in Marquette University’s new engineering building will give students a real-world look at concepts in action


LOCATED IN MILWAUKEE, Marquette University is home to a College of Engineering with a philosophy of learning by experience. The first phase of the $100 million, two-phase
Discovery Learning Complex has been equipped with strain gauges, pressure plates and other instrumentation to provide just that. The 115,000-sq.-ft structural steel facility will provide all engineering disciplines a place to study engineering concepts and their real-life applications with data from the instrumentation.
The five-story building is set to open in August 2011 and consists of classrooms, offices and laboratory space. The
5,000-sq.-ft Engineering Materials and Structural Testing Lab
(EMST) in particular will see plenty of use from civil engineering students. A student commons area also will be included with a goal of fostering communication and cooperation among different engineering disciplines.
The selection of steel for the framing system not only enabled the structure to be a laboratory for civil engineering students but also was the most economical choice. Other advantages to the selection of steel framing include BIM and instrumentation considerations. BIM is more conducive to modeling a steel structure than one constructed with concrete, which allows the college to have a virtual model of the structure after construction, making the demonstration of stress effects much easier. Also, it is less labor intensive, and therefore generally cheaper, to attach strain gauges to a steel beam than to reinforcement steel in a concrete beam.
Instrumentation
The instrumentation for structural engineering purposes includes more than 120 strain gauges located on bracing and column members in braced frames, on beams in moment resisting frames, at the mid-span of a crane runway beam, and in a composite floor beam, among other locations. Also two Geokon pressure plates have been installed, one in a spread footing and the other centered below a braced column in a combined footing. An anemometer will be installed to gather information about wind speed and direction. Other engineering departments have plans to model and monitor environmental building aspects, such as energy use and water consumption.
More detailed plans for those analytical tools will be made post-construction.
 
<<The strain gauges on beams in the Discovery Learning Center will allow students to see how the strain differs between composite and noncomposite beams.

Student Learning and Benefits
Although specific details are still being determined about how data from the building instrumentation will be incorporated into the learning environment, civil engineering professor Christopher Foley envisions that this building in which students study will itself become an analytical model and experimental subject. The wide scale instrumentation provides an unusual opportunity to enhance the engineering curriculum, enabling students to take the pulse of the Discovery Learning Complex.
Engineering students already familiar with National Instruments’ LabVIEW software from their freshman year coursework ideally will be able to enhance their data acquisition and analysis skills by tapping into “data ports” located throughout the building and accessing data for real-time building responses. There also will be a general public display of real-time building responses, but the primary purpose of the instrumentation is providing data for student analysis. Data already are being collected from the successfully installed pressure plates demonstrating how earth pressures change during construction.
When winter winds cause increased deflection of the five-story building, students will be able to estimate the wind loads from wind anemometer data and correlate the two.
Strategic experiments using the motion of the overhead crane in the Engineering Materials and Structural Testing Laboratory will demonstrate the abstract concept of influence lines to students in structural analysis classes. The runway crane beam, equipped with strain gauges in both the major and minor axis directions, also will function as an example of a noncomposite beam, providing data for shear and moment analysis as well as mechanical analysis of composite shapes.
Data obtained from the instrumentation of composite beams will facilitate a simple strain gradient demonstration, showing students— rather than just telling them—how the strain over the height of a composite beam differs from a noncomposite beam.
The architectural requirements of the building conveniently dictated the use of
X-bracing, chevron bracing, and moment resisting frames as part of the structural system. Instrumentation of beams, columns, and brace members at these locations will allow students to compare the difference in axial forces in these bracing options and comprehend the fundamental differences between them. Although many of these demonstration ideas are conceptually simple, the data analysis can be quite complex. Data interpretation skills developed by Marquette students at the Discovery
Learning Complex will surely be invaluable. The fact that students will be able to analyze the building in which they study will bring these sometimes abstract classroom concepts to life.
Instrumentation is becoming a relatively low-cost addition to most buildings. The important thing for implementing this idea is having an enthusiastic owner and project team. It would benefi t the civil engineering profession if more universities and owners who want to learn more about their structures incorporated this technology into future buildings to gain a new perspective of their surroundings.

Adding modern-day analysis to a classical design yields a light and airy atrium

Revising Traditional Workflow
Traditionally, a project such as this begins with the engineer creating his models in the analysis software. Depending on the complexity of the job, numerous models may need to be invoked.
Once the analysis is completed, redline markups usually follow for the drafter.
On the NRUCFC project, invoking a fully integrated approach within REVIT reversed this workflow process. The goal was to have one model serve two purposes. By implementing a bi-directional link from the analysis software, ETABS, to REVIT
Structure, required starting the model with preliminary member sizes and locations within REVIT. The member sizes, materials, and loads were assigned in REVIT. An internal mapping file was used to help associate the REVIT frame attributes to the ETABS section database.
As changes and modifications to the structure occurred during the design phase, the implementation of the bi-directional link from REVIT Structure to ETABS allowed for ease of review and coordination. By updating the changes once in REVIT and using the bi-directional link, the ETABS model was updated shortly thereafter. The analysis in ETABS was run, reviewed, and then linked back into REVIT Structure with any changes.

Dome Design
To reinforce the feeling of spaciousness, the three-story atrium was created using tapered curving HSS truss sections. These partially exposed HSS truss members were used to fashion an elegant and sleek look to the dome structure. At the apex of the dome, a
24-ft oculus glass opening was designed to allow natural light to flood the atrium below. Bracing several of the dome columns, a cantilevered walkway from one wing of the building to the other was utilized. The added weight and stiffness of the framing for the walkways helped counterbalance the weight from the dome steel as well as support the dome columns.
The dome was created using a perimeter of 24 wide-flange columns, spaced every 15 degrees around the dome. The top and bottom chords of the truss were HSS8x8x3⁄8 and the web members were
HSS4x4x¼. The dome’s profile and curvature play an important aesthetic role in the building. The dome trusses are visible not only from inside the building, but from outside as well. The HSS trusses taper upward to create the dramatic open feeling at the top of the atrium. Keeping the top chords constant, the bottom chords taper from an outside truss height dimension of 5 ft 6 in. to the inside truss height dimension of 3 ft.

The depth to span ratio for the dome is 1:4. Creating the 24-ft-diameter opening for the oculus glass required top and bottom compression rings. These rings are continuous HSS8x8x38 members that carry the weight of the truss as well as the weight of the glass. Holding these rings together are vertical HSS8x8x38 members.
As the rings undergo large compression forces, the trusses transfer the load back to the supporting perimeter columns. These columns then undergo large tension forces exerted by the trusses pushing outward. To resist these forces, the columns are joined together at the top and bottom of the truss by HSS6x6x¼ tension members. These members help stabilize the dome by resisting the outward push.

Dome Connection
The connections for NRUCFC were designed by SteelFab using structural connection design software that was developed by its in-house staff of licensed professional engineers. The HSS dome truss was designed per AISC 360-05, Section K2, with directly welded connections, mainly due to the aesthetic considerations for the architecturally exposed structural steel. All of the HSS truss members were sized such that the limit states of chord plastification and shear yielding (punching) do not control; therefore chord reinforcement was not required. Considering eccentricity in the joint configurations helped to economize the connections by allowing single bevel cuts for all branches and no overlapped joints. The branch connections were primarily made with fillet welds, with partial joint penetration groove welds used as well for the diagonal members.
Using CJP welds with HSS members can be challenging, as the preparation and fit-upare more demanding. Therefore CJP welds were used only for the critical joints, such as field splicing the compression ring, which had been fabricated as separate rolled HSS members, and the chord to compression ring connections. The CJP weld was accomplished by providing a ½-in. backing plate cut to fit within the inside profile of the HSS member. The plate was recessed ¼ in. inside the HSS member, allowing for ¼-in. backing at the joint root opening. A typical HSS truss chord to compression ring connection is shown below, followed by a typical compression ring splice connection.


<<The connection detail for the
chord connections.

<<The connection detail for the compression ring field splice.

<<The added weight of the cantilevered bridges connecting the two wings helps brace the columns supporting the dome and counter-balances the weight of the truss dome.


Construction
Sequencing and erection also served as a challenge. With its unique shape and difficult location in the building, each truss member was fabricated in the shop. For ease of erection, the columns were spliced below the trusses. That allowed the trusses to be connected to the columns at the shop.
Each truss was then erected and welded to the supporting column below.
Temporary shoring was erected at the center of the dome to support and carry the weight of each truss until final connections could be made. Erecting the entire truss on the ground and hoisting it up was not an option due to limited access for the crane. Once the shoring was in place and temporary connections were made to the truss, the bridge connecting each side of the building was erected. The added weight of the cantilevered bridge not only helped brace the columns supporting the dome, it also counterbalanced the weight of the truss. With the dead weight of the bridge offsetting the weight of the truss, it was important to allow the truss to deflect and the columns to rotate until the bridge was in place. Once completed, temporary connections were removed and permanent welded connections were made. Scaffolding was then cut down piece by piece, removed, and the building was ready to be enclosed.
The structure is expected to be completed in July 2011. Even though the project did not employ Jeffersonian design or construction techniques, the gentleman from Virginia no doubt would have been pleased to have NRUCFC join the neighborhood.

Three stunning structures combine to anchor the new Fort Worth Museum of Science and History

THE FORT WORTH Museum of Science and History has been operating for many years, enlightening and inspiring multiple generations. People speak fondly of memories they have of exploring the museum when they were children. However, decades of wear and tear, plus ever-expanding exhibits and growing attendance, made the 1954 museum building inadequate for the new century.
Although a difficult decision, it was time for a new museum.
The new Fort Worth Museum of Science and History replaced the existing museum building on the same site in November 2009.
The museum has 166,000 gross sq. ft composed of one-story and two-story spaces. The building consists mostly of exhibit spaces, classrooms, support areas, public spaces and dining areas. Three unique steel structures are the main massing of the building design: the new domed Noble Planetarium, the Energy Gallery roof, and the main entrance, called the “Urban Lantern.”

Domed Noble Planetarium


<<Arriving on site as individual pieces, the Noble
Planetarium Dome was assembled on the ground, then lifted into place.


The new Noble Planetarium is a state-of-the-art facility that sports a 50-ft-diameter steel-framed “ribbed dome,” which was completely fabricated on the ground and lifted into place. That operation was featured prominently in the Dallas Morning News and was the symbol of construction progress for some time.
The dome is constructed of arched ribs, joined together with a compression ring at the top and tension ring at the bottom. It has 8-in. wide-flange column ribs with 2-in.-diameter transverse pipes encircling the dome in concentric rings. The rings serve as lateral bracing for the vertical arched members, add rigidity for the dome, and provide support for the dome cladding.
The dome members were delivered as individual pieces ready to be assembled like a kit of parts. A staging area next to the final location was set up for the erection process where the steel erector welded the elements together on the ground.
All vertical wide-flange ribs were welded to the tension ring at the bottom and converged to a compression ring at the top of the dome. Once the ribs were in place and the transverse pipes were installed, the resulting configuration was a semi-rigid grid that resisted racking and was stiff enough to be lifted into its final location.
Additionally, smaller tubes and angles were connected to the main frame to accept the dome cladding. This additional framing enhanced the smoothness of the dome to prevent ridges or offsets from occurring between cladding panels.
Months earlier, additional analysis and careful coordination among the structural engineer, erector and contractor had been performed to allow the nearly lawless installation to occur. Hanging locations were determined and analyzed for performance during the 60,000-lb lift. The erector performed an in-depth study of shoring and the hoisting procedure that ended in an evolution that appeared to spectators as a quick and easy solution.

The planetarium’s second floor framing was carefully analyzed and designed to minimize vibration interference from exterior distractions to ensure successful operation of the projector. Locating a column directly below the mechanism and increasing the concrete slab thickness pro-vides the required platform stability and helps mitigate vibration interference with the projector.

The Energy Gallery Roof

<<To help control gravity load deflections in the Energy Gallery roof’s 55-ft cantilever, engineers provided 6-in.-diameter pipe columns tucked behind mullions.


The Energy Gallery roof was designed with 7-ft-deep steel trusses, supporting an 8-ft-tall ribbon of brick. The visual expression of the structure is a 50-ft cantilever with a 15-ft backup span and support. To control gravity load deflections and high stresses, the “cantilever” is supported by small intermediate columns consisting of 6-in. pipe located behind window mullions.
This configuration contributed to significant calculated wind sways at the end of the cantilever in the transverse direction, because the only wind bracing in the trans-verse direction is at far end of the space.
The high roof uses horizontal X-bracing to maximize the rigidity of the diaphragm to transfer the lateral loads to the rear bracing system. The low roof diaphragm minimizes the sway of the structure and helps distribute the lateral loads.
Close coordination with the glazing manufacturer’s engineer was required to accommodate the anticipated structural movements. The connections for the tall windows were designed to accommodate larger than usual horizontal and vertical movements. Attention to these details of the design by the structural engineer and the glazing manufacturer’s engineer was critical to its success.

The Urban Lantern

The Urban Lantern is the pride of the museum. Its proportions and interior volume create a space that is tall, open and impressive. The Lantern is 76 ft tall and topped with a glass box made of 97 yellow-fretted glass panels, each measuring 5 ft 7 in. square and weighing 500 lb.

The Lantern is a critically important element because it is the gateway to the museum. Design architect Ricardo Legorreta expressed this by saying, “Light symbolizes knowledge, creativity, imagination and spirituality. Color, on the other hand, for us means passion for life, humanism and happiness.”
Careful computer modeling and structural analysis were conducted using RISA to ensure the framing system and brick sup-ports would perform as expected. The basic approach was to create a braced tower with an open interior. Usually a tower would have horizontal cross-bracing or floors to prevent racking and distribute lateral loads, but this was not an option. Instead, engineers used the building’s adjacent low roof diaphragm and a 5-ft 10-in.-wide reinforced concrete slab on composite deck at the tower’s second level to provide racking strength. This essentially created a rigid floor slab with a big hole in the middle of it. Additionally, the roof corners at higher levels have similar concrete slabs to enhance stiffness.
Full-height cross-braces were provided at the corners of the tower for stability. Horizontal HSS12r6 girts at 10-ft vertical spacing tie the tower together and provide connection points for the brick support system.
The exterior brick is supported by a system specifically designed not to have visible horizontal kickers so as not to obstruct the interior open space. Vertical HSS5r5 members spaced at 4-ft centers provide support for the brick shelf angles at each level. The horizontal HSS girts are designed to resist the moments and reactions from the vertical tubes induced by wind and the eccentric brick loads at each level.
The unique idea of Legorreta’s Urban Lantern incorporates a glass box to the top that glows at night, guiding its patrons to the museum’s front door. The structural engineer conceived the structural concept and design of the glass box at the top of the tower. Then Menomenee Falls, Wis.-based manufacturer Novum
Structures LLC implemented the design and built the glass box.
The loads calculated by Novum’s engineers were provided to the structural engineer to include in the overall building model.
This state-of-the-art glass system includes unique proprietary glass connections and expansion joints designed speciically for the
Fort Worth area. The end result accomplished the architect’s vision.
The Fort Worth Museum’s “extreme make-over” resulted in a facility that is world class and will be a source of pride for the city, museum and the designers for years to come.    

Wednesday, October 27, 2010

Curved steel provides the non-traditional framework for a tradition-laden dome

CELEBRATED ARCHITECT  Christ J. Kamages builds faith.
And when Simpson Gumpertz & Heger Inc. (SGH) was offered the opportunity to structure one of his crown jewels, it was truly a humbling experience for the entire design team.
St. Nicholas Constantine and Helen is a Greek Orthodox Church complex in Roseland, N.J. The project consists of a main church building, a school building, a central rotunda and a gymnasium/social hall. Spread over 39,000 sq. ft, the complex is a visual delight with the centerpiece being the main church building with its characteristic Byzantine design.
Design for the building started in early 2006. From the very beginning, steel was the primary material of choice for all except the main church building. Given the many curved and faceted roofs intersecting with each other, the design team initially considered concrete for the main church building. After considerable research and discussions, the decision was made to use curved structural steel combined with curved metal studs. One reason for this was to eliminate mixing of trades. Because the remaining portion of the facility was going to be framed in steel, it was prudent to use one material which would streamline the entire construction process. Additionally constructing a concrete dome would have required special expertise and likely would have driven up the overall construction cost. The fact that a concrete dome would weigh substantially more also would have increased foundation costs. One concern about using steel was the considerable amount of field welding required, but that single factor was not enough to tilt the balance in favor of concrete. In retrospect, this decision has proven to be a good one.
The progression from design drawings to shop drawings to fabrication and erection was completed smoothly with minimal glitches. West Coast mentality for complete connection details on the contract documents was, at least to some degree, helpful in attaining this achievement. The decision to use steel also reduced the number of trades involved in the superstructure and improved the construction schedule. At the same time, a slump in the construction industry in mid-2008 enabled the church to get a much more competitive bid for the complex church building with its ornate design and curved steel framing.
The church complex can be separated into three segments. The first is the education/school building complex, a single-story 60-ft by 150-ft building with one level of basement. The main floor at grade consists of 4½ in. normal weight concrete over B decking and open web steel joist framing. The lateral system for the above-grade structure consists of cold-formed bearing wall with plywood sheathing. Although constructed as a single-story structure, there was a clear directive from the owner to design it considering a future expansion of one level. Accordingly, SGH designed a pseudo floor below the roof with standard floor loading and placed the steel trusses above this floor. This was done so that in the future, if required, the owner can simply remove the roof trusses, build one level of framing and reuse the roof trusses.

Although the addition of this extra floor increased the initial construction cost, there were tremendous gains from this decision. First, this pseudo floor gave the owner the flexibility of adding an extra level without having to worry about possible additional costs of retrofitting the gravity system had it been designed as a single-story structure. Second, the classrooms can continue to function as the new floor is being added, whereas they would certainly have to be relocated, albeit temporarily, for the retrofit option. Although a detailed cost benefit analysis was not conducted, common sense evaluation tells us this was a prudent investment that the owner chose to make up front in order to reap the benefits later.
The main church is roughly 100 ft square in plan with a vertical height of 35 ft to the dome base. The dome, approximately 50 ft in diameter, rises another 15 ft from the springing level culminating in the traditional cross at the top. The main lateral system for the dome is provided by eight 24-in. diameter pipes with a moment-connected continuous HSS20r12r5⁄8 member at the eave level (29 ft above the floor). Eight inclined W14 cantilevers attach to the pipe columns at that level and rise up to receive the base for the dome. The dome itself is made up of 20 curved HSS10r4r3⁄8 ribs connected by a ½-in.-thick continuous compression ring at the top. In addition, there is sub-framing consisting of curved or piece wise linear cold-formed stud framing that makes up the surface of the dome.
The curved ribs supplied by the fabricator were welded to the compression and tension ring in place and provided perhaps the single most challenging aspect of the whole dome construction. It took the con-tractor roughly three weeks to finish welding the ribs. Unfortunately the timing also coincided with the summer rains, which resulted in considerable interruptions during the construction. Apart from the domed portion, the church building also has a two-story choir loft that is a steel braced frame structure with composite steel framing.
The main church building gradually meanders into the gymnasium area via a rotunda with a domed roof framed in a similar way as the main church dome. The gymnasium building is a large open area, 100 ft by 100 ft, with the roof framing consisting of non-composite roof decking over open web steel joists. The lateral strength is provided by steel braced frames with the roof decking serving as the diaphragm. In addition, there are several low-level structures around the perimeter supported by cold-formed stud bearing walls with ply-wood sheathing.
The foundation system for the three buildings is a combination of isolated footings and continuous strip footings underneath the bearing walls. Braced frames are supported on combined footings. Perimeter footings are founded 4 ft. below the adjacent grade due to frost concerns.

The International Building Code 2000 New
Jersey Edition was used for the design of the buildings. A ground snow load of 25 psf was considered for all roof design. In addition, several cases of unbalanced and drift snow loading were considered due to the complicated roof levels and shapes. Generally wind governed the lateral design for most cases (Basic Wind Speed = 100 mph, Exposure B) although SGH performed a response spectrum analysis on the main church building in the spirit of a true West Coast design firm.
Another paradigm shift for SGH-San Francisco was setting up the design documents to suit East Coast fabricators. This applied especially to the connections, both gravity and lateral. Whereas a single welded shear plate with bolted web is the most common west coast gravity connection, a conversation with our colleagues in our Boston office revealed that welded double angles with bolted web is what N.J. fabricators are used to seeing. Additionally, where a West Coast drawing will typically lay out all the connection details for the lateral system, significant freedom is given to the East Coast detailer for designing such connections with only the required connection force mentioned in the drawings. In the end, the detailing of the gravity and lateral connections approached West Coast thoroughness and connection forces were specified for the detailers. The net result was that the detailers clearly understood the design intent, but still had flexibility to adjust the details in accordance with East Coast shop practice. Although such differences never created major impact, there were several spirited “Oh you California guys” type of conversations with the detailer during the shop drawing phase.


As the design phase transitioned into the shop drawing phase, we quickly realized the enormity of the problem of shipping three sets of shop drawings back and forth across the country.
Not only was cost a concern, but also the time lag involved in a reasonable mode of delivery. Technology provided a solution and greatly simplified the process. Drawings mostly were transferred over the Internet in PDF format, checked and marked in the editor and emailed back to the fabricator. Not only did this save time, we also managed to save a few trees in the process.
At the time of publication of this article, steel has been completely erected with the interior improvements progressing in full swing. With the passing of every milestone, the view looks more similar to the artist’s rendering bringing smiles to the members of the design team. This project demonstrates once again that structural steel can accommodate unusual and complex shaped structures and result in competitive costs and meet schedules.

 
^Structural steel being erected for the church building

Kansas City’s new performing arts center is a showcase of outstanding steel-framed structures


A Kansas City’s new performing arts center is a showcase of outstanding steel-framed structures.
ATOP A HILL with a commanding view to the south and overlooking the revived Crossroads Arts District sits the newest addition to the Kansas City skyline, the Kauffman Center for the Performing Arts. This world-class entertainment venue has proven to be as challenging to design and build as it is expected to be beautiful and functional.
Scheduled to be completed and ready for the 2011 performance season, it will be the performance home for the Kansas City Symphony, the Lyric Opera of Kansas City, and the Kansas City Ballet.
The Kauffman Center, envisioned by Muriel Kauffman of Kansas City as early as 1995, was finally brought to fruition by her daughter Julia Irene Kaufmann. The 285,000-sq.-ft facility consists of the 1,600-seat Helzberg Hall, for symphonic concerts, and the 1,800-seat Muriel Irene McBrien Kauffman Theatre for live stage performances. A third independent structure acts as a shell enveloping the two internal buildings. This unique architectural showpiece starts with a series of segmented vertical arcs forming the north wall and, from the top of the arcs, descends to the south with a gentle sweep ending with its signature cable-supported glass atrium.
A Structural Framing Challenge The complex geometry and intricate connections required to connect the symphony of trusses and rolled beams resulted in hardly a 90° angle or straight piece of steel anywhere in the structure. Working as a subcontractor to J.E. Dunn Construction, Hirschfeld Industries was specifically selected as the structural steel contractor on this unique project because of its history of expertise with complex steel structures and in particular, the detailing, fabrication, and erection of elaborate trusses.
When completed, the structure weighed in at 3,989 tons of steel with 938 tons, or 24% of the total structure, being rolled steel. Rolling was equally split in the hard direction and in the easy direction. The top and bottom chords of the north wall vertical trusses are typically W14r99s and W14r211s rolled the easy way.
The top and bottom chords of the east/west trusses forming the roof of the shell and curved in the horizontal plane are typically
W14r90s rolled the hard way.
The concert hall, located on the east side of the site, consists of six levels of structural steel framing. The roof of this structure comprises six straight east/west trusses with clear spans ranging from 43 ft to 104 ft and an average depth of 14 ft, all supported by the concrete at Level 8. The organ trusses, aptly named for shaping the back wall of the organ chamber and echoing the shape of the outer shell, are located at the north end of the structure and consist of eight curved vertical trusses each approximately 47 ft in height extending from the concrete frame at Level 8 and connecting at the top to one of two trusses.
The second internal building, the proscenium theater, is located on the west side of the site and also consists of six levels of structural steel framing. This structure takes a slightly simpler approach with the roof structure consisting of only four straight east/west trusses with the northernmost truss tied into the concrete stage tower just to the north. A maze of multi-leveled curved catwalks is hung from the trusses.
The massive free-standing lattice shell forming the north wall is composed of 27 vertically curved north/south trusses rising to a height of 139 ft above the ground. Stretching between the top of the trusses and the box truss and defining the extreme south end of the steel structure is a series of W24s and W21s in the same vertical plane of each of the corresponding curved trusses.
Lateral resistance in the north/south direction is provided by six braced frames. Lateral resistance in the east/west direction is also provided by braced frames between the north wall trusses.
        ENLARGE IMAGE       
^
^

A Many of the connections required multiple connection plates at various angles, posing challenges to both the detailer and the fabricator.


Acoustical Issues
Internal noise abatement is a critical consideration for dual-use venues such as this. Throughout the design and construction of the steel framing, careful consideration was given to avoiding the transfer of airborne noise as well as reverberations throughout the structure. The structural steel frames for the concert hall and theater were designed to be completely independent of the surrounding steel and concrete structure. A minimum acoustic joint of 2 in. at ground level, increasing to more than 6 in. at the top of the structure where the wind loads are more significant, was required between the inner buildings and the shell to control both airborne and structure-borne noise from entering the occupied space. Inspections conducted at the end of the erection of each sequence before vacating a specific area ensured that all temporary erection aids had been removed, thus preserving the acoustic isolation.

Detailing Connection Design
Consteel Technical Services, a wholly owned subsidiary of Hirschfeld Industries,  used Tekla Structures, version 11.3, to provide highly accurate and interactive 3D computer modeling. With the structure being predominantly curved with braced frames on radial grid lines, it was by far the most complex and challenging structure the team had detailed. Structural Solutions,
Inc., designed the bolted connections using standard holes, per the erector’s requirement for immediate stability of the member, and slip critical bolts using a Class B faying surface. This resulted in a lower bolt shear capacity than for a bearing condition, so the quantity of bolts and size of the connections increased. However, it was required to eliminate any slippage in the connection and maintain the specified tension in the cable structure connected to the structural steel.
As many as 20 modelers, editors, and checkers were working in the Tekla model at any one time. Difficulties sometimes were encountered in avoiding clashes within the model, although these were not insurmountable problems. Unexpected problems were encountered, however, as the size of the model eventually approached the capacity of the software simply due to the complexity of the geometry. This was resolved by separating the model into two independent models—one for the concert hall and proscenium theater internal buildings and another for the external shell. The separation was done after the overall geometry had been established and shop drawings were being developed for the north wall, so there was little potential for any unknown clashes between the two models. However interface checks between the models still were done on a regular basis. (See sidebar “No More Maxing Out.”)
Throughout the detailing process, close collaboration between the design team, connection engineer, general contractor, and steel fabricator was a necessity in finalizing the structural design. Virtual meetings using online visual and audio links (via “Go to Meeting”) were an essential tool in bringing all parties together to visualize, design, and detail, the complex nodes with massive shear plates converging at different relative angles. As the 3D model was being developed, a detailer was brought in to work face to face with the design team, thereby incorporating the myriad of painting and fireproofing details on the steel as well as the exact location of the shop-attached pourstop. This preplanning was extremely beneficial to all and resulted in minimal field modifications and interruptions.

The lateral load resistance system, braced frames, consisted of wide flange diagonals connected to gusset plates with claw angle connections. The axial transfer forces across the joints were accommodated with massive end plate connections, some as long as 11 ft and up to 3 in. thick, with the flanges shopwelded to the end plates. This applied tension to the end plate bolts, reducing their effective clamping force and thus their slip resistance. The connections were carefully designed to ensure the required capacities were achieved, all while allowing for no connection slip at strength-level forces.
The cable supported glass system at the south end of the building introduced significant challenges to the connection design. Due to the high tensile forces required developed by the cable system, significant lateral and vertical loads were imparted into the external shell structure. No connection slip could be permitted in order to ensure the cables maintained their required tensile forces.
The connection design information was provided by the connection engineer to the detailer via connection tables for the simpler connections and intricate AutoCAD sketches for the more complicated joints. As the joint complexity increased, this process became iterative, with the connection engineer and detailer sharing copies of the 3D model until the joints were finally and completely detailed. Before the shop drawings were sent to the design team for approval, the connection engineer reviewed each one to ensure the connection design intent was correctly interpreted. The result was a steel structure of untold complexity erected with very few it-up issues in the field.

Fabrication
Dividing the structure into ten fabrication/erection sequences (one for the concert hall, one for the proscenium theater, and eight for the outer shell) and further subdividing the structure into 54 manageable shipping priorities allowed the construction site to maintain the erection at a productive rate while keeping the staging areas from being inundated with not-yet-needed assemblies.
To accommodate the compressed fabrication schedule, truss fabrication was done mostly in Hirschfeld’s Abilene, Texas, shops with the structural work being conducted in its San Angelo, Texas, shops. Trusses were shop assembled to the greatest extent possible still allowing the shipping of oversized and overweight assemblies to Kansas City via permit.
During crucial fabrication periods, Hirschfeld engaged a detailer to be present in the shops armed with the latest technology - and electronic total station and the industrial measurement software. That enabled extraction of the 3D coordinates from the
Tekla model and their transformation into any plane required to achieve the complex build of the roof steel curved members as well as satisfy the tolerances required during fabrication. This essentially gave the shops the capability of building any achievable shape.
Conversely, the shops could take the as-built subassembly dimensions and transfer the data back into the model to provide actual to theoretical comparisons. This would then allow a simulated trial erection of fully formed truss assemblies before lifting and confirming that the interface with adjoining members worked.

Erection
Not unlike the talent of the performers and the tireless rehearsals needed to create the magnificent sound soon to be found in the Kauffman Center, the construction process of the structure required the absolute best contractor partnerships in the industry to orchestrate every detail. Integral to the preplanning and execution of the erection of the structural steel was the 3D modeling and staged analysis of an elaborate 52-stage erection/stability plan created by the Midwest Steel erection team. Twenty-three drawings, by section, were generated for stability bracing, 14 drawings for rigging of all lifts and seven drawings for crane logistics. Critical to the development of the detailed erection plan was a staged load analysis to maintain stability for the partially erected structure. Secondary construction loads were considered to accommodate the follow-on trades during erection as needed.
There were 26 critical lifts planned and executed on this project.
The connection points at the tops of each building were erected several months prior to the erection of the vertically curved trusses.
Control of the position was critical in order to erect the back of the house and close the structure. Jacking frames were designed to stabilize and maintain geometry of the trusses. The front of the house had a continuous curved box truss that ran from one end of the project to the other connecting the exterior structures of the con-cert hall and the proscenium theater. This was considered the most critical geometry on the project and served as the geometrically critical connection basis to the structure for the cable-supported glass atrium that served as the entire front of the structure.
For each lift a critical lift plan was developed and team meetings were conducted to simulate every detail and to be sure every-one understood their roles in the process. The Tekla model was a critical tool for this project. Within the model, Midwest Steel was able to verify piece weight and geometry, determine the center of gravity of the pick piece and to review the swing path for the piece.
Crane staging was verified in relation to the initial staging position, the final set position and to verify a clear swing path. Lay-down areas were coordinated for pre-assembly, trip and set.
A universal lifting apparatus was designed and modified as detailing progressed. Prior to erection, a practice lift was performed to verify crane capacity using the onboard computer and to make sure the swing path was unobstructed. This was a major concern due to the geometry of the building. There were many levels of concrete and steel to navigate the crane boom and picked piece around in order to set each piece. In addition, step-by-step, bullet point directions were created and used by the crew during the lift which kept everyone focused on safety.
Another factor of expertise was appropriate equipment selection to execute the lifts. Plans were developed that reduced crane movement and lowered the sled weights. These details saved time, eliminated the need for a secondary crane, and resulted in safer execution of the lifts.
The Kauffman Center’s structural steel work was completed in
February 2010. The facility is scheduled to be fully operational for the 2011 performance season. For more information, visit www.kauffmancenter.org.
As with all large undertakings, the development of the Kauffman
Center project has been a collaborative team effort. Jon Vinson, who recently completed his 40th year with Hirschfeld, has been a key player from the inception of this project. He spearheaded the realization of the design as it advanced toward the fabrication stage and deserves a lot of credit for its successful completion.
The author also wishes to thank Tom Broad of Midwest Steel for providing information on the erection methodology.

A Many of the connections required multiple connection plates at various angles, posing challenges to both the detailer and the fabricator.


Copyright@2010